In this blog post, I will go through the steps that it takes to create a host transport node within NSX-T. Before we get started with creating a host transport node, let’s explain what they are.

Transport Nodes

NSX-T requires transport nodes to perform networking (overlay or VLAN) and security functions. It is responsible for forwarding the data plane traffic originating from VMs, containers or apps running on bare metal servers. NSX-T supports the various types of transport nodes including: Hypervisor (ESXi or KVM), Bare Metal (RHEL, CentOS, Ubuntu), and NSX Edge. Since NSX-T is decoupled from the hypervisor, ESXi and KVM transport nodes can work together and networks and topologies can extend to both ESXi and KVM environments.

Transport Node Components

Each transport node has a management plane agent (MPA), local control plane (LCP), and N-VDS installed. The NSX Manager polls for configuration, statistics and status from the transport node using the MPA. The LCP computes the local runtime state for the endpoint based on updates from the central control plane (CCP) and local data plane information. It also pushes stateless configurations to forwarding engines in the data plane and reports the information back to the central control plane. The N-VDS, also known as the host switch, is the primary component in the data plane. It does the switching, overlay encapsulation and decapsulation, firewall creation, and routing. The N-VDS is what is used to attach VMs to NSX-T logical switches and for creating logical router uplinks and downlinks. The N-VDS gets installed on a transport node once the node has been added to a transport zone, as each transport zone has it’s own N-VDS.
Read Full Article

In this blog post I will go through the steps that are needed in order to create an IP pool that will be used by our Virtual Tunnel Endpoints (VTEP). VTEPs are the source and destination IP addresses that are used in the external IP header in order to identify the hypervisor hosts that are originating and terminating the NSX-T encapsulation of overlay frames. An IP Pool isn’t necessary in order to assign an IP address to a VTEP. You may also do so using DHCP or manually assign a static IP address.

Create an IP Pool

From a browser, log in to the NSX Manager with admin privileges.

mig01 Read Full Article

In this blog post, I will go through the steps that it takes to create transport zones within NSX-T. Before we get started with the creation of the transports zone, let’s explain what transport zones are

Transport Zone Overview

Transport zones control which hosts and, essentially, which VMs can participate in a particular network by limiting what logical switches that a host can see. A transport zone can span multiple host clusters and a NSX-T environment can contain one or more transport zones but a logical switch can only belong to one transport zone. Since logical switches are limited to a transport zone, VMs in different transport zones cannot be on the same L2 network. NSX-T introduces the concept of the NSX Managed Virtual Distributed Switch (N-VDS, previously called the hostswitch). The N-VDS is what allows physical to virtual packet flow and it does this by binding logical router uplinks and downlinks to physical NICs. Each time you create a transport zone, you must provide a name for the N-VDS that will be associated with it as well as the traffic type that will take place.

Types of Transport Zones

There are two different types of Transport zones, Overlay and VLAN:

  • Overlay Transport Zones
    • Used by both the host transport nodes and NSX Edges
    • A N-VDS will be installed on the host or NSX Edge after it has been added to the overlay transport zone
  • VLAN Transport Zones
    • Used by the NSX Edge and host transport nodes for its VLAN uplinks
    • A N-VDS will be installed on the NSX Edge when it is added to the VLAN transport zone

Read Full Article

In this blog post, I am going to go through the steps that it takes in order to deploy the NSX Manager for NSX-T Data Center. To start things off, let’s get an overview of the NSX Manager.

What is the NSX Manager?

The NSX Manager is a standalone appliance that hosts the API services, the management plane, control plane, and policy management. As a result of this combined format, you no longer need to install the manager and controllers as separate VMs. The NSX Manager has three built in roles: policy, manager, and controller. The management plane includes the policy and manager roles. The central control plane includes the controller role. The NSX Manager also provides a GUI that is used for creating, configuring, and monitoring NSX components such logical switches, logical routers, and firewalls.

Deployment

To begin our deployment, log in to your vCenter. Find the cluster/host that you want to deploy the NSX Manager on and right click it and select Deploy OVF Template.

mgr01 Read Full Article

The new year is well on its way but for a moment, I’d like to go back and reflect over the years of my career. I can remember being fresh out of college and landing my first real gig as a Network Systems Analyst for a local school district in Mississippi, the Hinds County School District. Really, the title was a glorified way of being called a PC tech. But it was a good learning experience for me to “cut my teeth” into the world of IT and learning some valuable troubleshooting skills. Also, in that role I learned a lot of core technologies that I would use in later roles that I would attain. (Active Directory, Exchange, GPOs, Cisco Networking).

Fast forward 4 year later to the year 2011. I began work as a Senior Network Specialist for the Mississippi Division of Medicaid. I must say, this job felt like going to college and getting paid to do it. I enjoyed every bit of it. I learned so much in a short period of time and was exposed to all types of technologies that were new to me at the time. It was at this job that I first discovered VMware. I came in at a time when there was a state mandate to migrate all physical servers to the VMware platform. So, I quickly became familiar with the P2V tool from VMware. Starting at ESX 4.0, we migrated 95% of our infrastructure into a virtualized platform. From there, I got a chance to help in a series of upgrades, to ESXi 4.1, 5.0, 5.1, and 5.5. By then, I was bitten by the virtualization bug and I knew that I had found the technology that I wanted to focus my career around. And that’s exactly what I set out for. Read Full Article

vmware_Milestone_IE_NV6


Man….let me tell ya….I’m so happy to say that the “Road to VCAP6-NV” is complete! I passed my exam at VMworld 2018! Back in Oct 2017, I began my “Road to VCAP6-NV” series with the intent of giving myself a reference point to take my notes as I studied for the exam and also something that could be useful to the community. Well that work paid off!

Read Full Article

VMwareNSX
In this blog post I will cover section 6 objective 6.2 of the VCAP6-NV Deploy exam.

Objective 6.2 – Configure and Manage Universal Logical Network Objects


Skills and Abilities

  • Create/configure Universal Logical Switches
  • Create/configure Universal Distributed Logical Routers
  • Configure local egress


Create/configure Universal Logical Switches

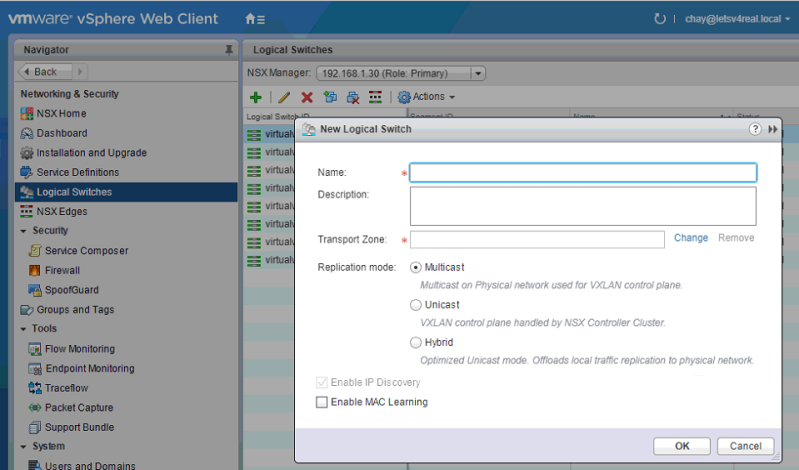
Universal logical switches can only be created from the primary NSX manager and when connected to a universal transport zone.

To create a universal logical switch, navigate to Networking & Security > Logical Switches. Click the green “+”. Enter a name for the logical switch. Click Change next to Transport Zone.

uni01 Read Full Article

VMwareNSX
In this blog post I will cover section 6 objective 6.1 of the VCAP6-NV Deploy exam.

Objective 6.1 – Configure Cross vCenter VMware NSX infrastructure components

Skills and Abilities
  • Configure NSX manager roles (Primary, Secondary, Standalone, Transit) according to a deployment
    plan:

    • Assign Primary role to specified NSX Manager
    • Assign Secondary role to specified NSX Managers
  • Deploy/configure Universal Controller Cluster
  • Configure Universal segment ID pools
  • Create/manage Universal transport zones


Configure NSX manager roles (Primary, Secondary, Standalone, Transit) according to a deployment
plan: Assign Primary role to specified NSX Manager

In a Cross-vCenter NSX deployment, the NSX Manager can have one of four different roles:

  • Primary
  • Secondary
  • Standalone
  • Transit

The primary role can only be given to one NSX Manager. The primary manager has the controllers installed and all universal objects are created on the primary NSX Manager. The secondary NSX Manager becomes secondary when it added to the primary manager. All universal objects are read only on the secondary NSX Manager. The secondary NSX Manager cannot have it’s own controllers. Each NSX Manager can have its own local objects that are only seen by that NSX environment. The Standalone role is the default role of a newly installed NSX Manager. It is not a part of a cross-vCenter setup. The Transit role comes into play when a once primary or secondary is made standalone again but there are still universal objects that exist. In the transit role, universal objects can only be deleted, not created. Once all universal objects are deleted, the NSX Manager can become a standalone or secondary NSX Manager.

To assign the primary role to a NSX Manager, navigate to Networking & Security > Installation and Upgrade > Management. Select the the NSX Manager and click the Actions wheel and select Assign Primary Role.

cross01 Read Full Article

VMwareNSX
In this blog post I will cover section 5 objective 5.3 of the VCAP6-NV Deploy exam.

Objective 5.3 – Configure and Manage Role Based Access Control

Skills and Abilities

• Implement identity service support for Active Directory, NIS, and LDAP with Single Sign-On (SSO)
• Manage User rights:

  • Assign roles to user accounts
  • Change a user role
  • Delete/disable/enable a user account


Implement identity service support for Active Directory, NIS, and LDAP with Single Sign-On (SSO)

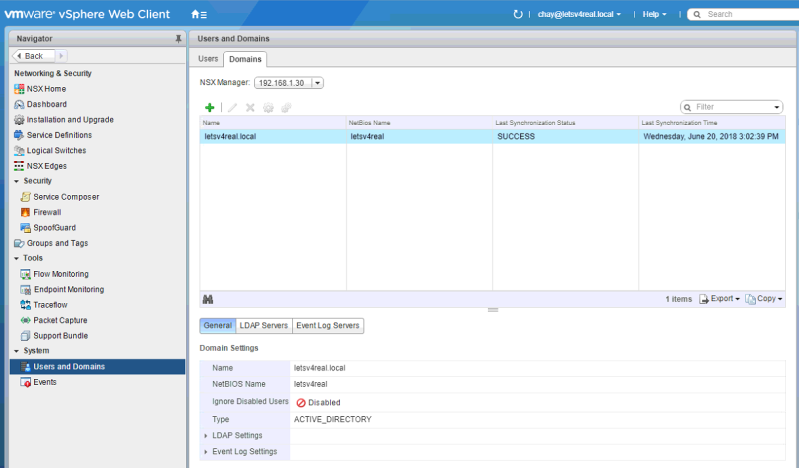
You can register a Windows domain with NSX Manager and vCenter. The NSX Manager will get the user and group info from Active Directory and that can be used to create identity based security groups and firewall rules and for activity monitoring. To register a Windows domain with NSX Manager, navigate to Networking & Security > System > Users and Domains. I’ve already configured this but in a new instance, click the green “+”.

ad01 Read Full Article