
Oh my, how fast a year has flown by and my how much has changed! Last year, in February, I came to the realization that if I really wanted to increase my knowledge and advance my career, then I needed to invest in a homelab. So, I made an investment and purchased a SuperMicro 5028D-TN4T system bundle from WiredZone. It has been a year since I did my initial review of this system and since then I have made good use out of it and decided to come back with my thoughts. Read Full Article
Home Lab
![]()
There are few things in IT that are worse than needing to recover some data and realizing that you don’t have a proper backup of it. Well, good thing for me, this only happened in my home lab and not at my day job. I suffered a power outage during some recent bad weather and one of my management VMs, the VM that had everything that I use to manage my home lab, decided it wasn’t going to come back up. Oh how I wish I had a backup of that VM so that I didn’t have to spend hours getting it back to where it was before the crash. So, I decided I needed to get something in place so that this wouldn’t happen again. Veeam…to the rescue! I’ve used Veeam before at my previous job as our primary backup tool but it never hit me to try it in my lab because I also remember the cost! And for a small home lab it just wasn’t feasible. But then I realized that Veeam gives a NFR license to vExperts…..say no more! In this blog I will go through the install for Veeam Backup & Replication 9.5. Read Full Article
Over the past few months, I’ve been searching for a good home lab server to replace the ones I had been using that were decommissioned and given to me by my previous employer…3 HP DL385 G6 rack servers with 64GB each. Well anyone that knows servers, know that these are not ideal from a home lab. Not only are they big, bulky and heavy, but they suck electricity like a newborn baby sucks a warm bottle (I can attest to this, being a new dad to a healthy,hungry boy) and on top of that, they can make a room HOT…really fast! I knew this was not a long term solution for me and there was only so much that I could do with VMware’s online HOL. I needed something that I could not only have to test out all the latest products from VMware without a 2hr or so limit, but also something that I could continue to use to prepare for advanced certifications and create content to share on the blog.
What I Wanted In A Server
First of all…it needed to be small. I have a office at home…not a dedicated server room. I wanted something no bigger than a desktop tower PC. To me, the smaller, the better. I also wanted something that would provide me with enough resources to run two of VMware’s most resource intensive products, NSX and vRealize Automation. Those two products alone would need about 50GB of RAM to install all the components to get up and running. I first began looking into the SuperMicro SYS-E200-8D and SYS-E300-8D servers. I was drawn first to their size and then to the fact that they could max out at a whooping 128GB of RAM. However, I didn’t like the idea of only have 2 options for storage, one 2.5 HDD and one M.2 slot. Then I stumbled across Paul Braren from TinkerTry on Twitter and that’s when I discovered what would soon be my next home lab server.
What I Got
I ended up purchasing a SuperMicro SYS-5028D-TN4T server bundle from WiredZone and added two additional 32GB DIMMs to have a total of 128GB of RAM.

![]()
So, I was rebuilding my lab yesterday…getting ready to begin studying for the VCAP exams…and after building the vCenter server, I go to log in for the first time and get this…
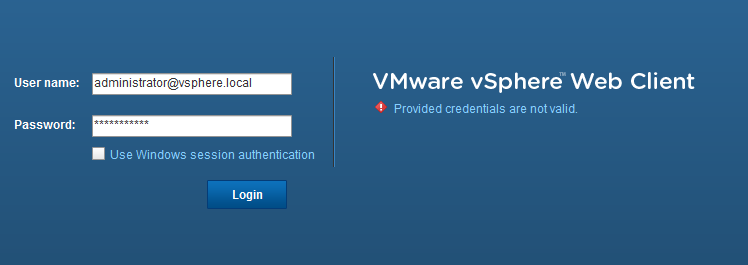
Now I just know that I’m typing in the password correctly. I mean, I did just make it 10 minutes prior to this! But whatever the case, I can’t get in. So now I need to reset the password on the SSO admin account. Here are the steps to do just that. Read Full Article
I wanted to create this post because like me, many people just don’t have all the necessary equipment to create a full blown lab to play around and test things in. Also, I like the ability to be portable and I think its safe to say that a server isn’t the most portable thing in the world. In comes the powerful laptop. At my disposal is a Mid 2015 MacBook Pro with a 2.5 GHz Intel Core i7 with 16GB of DDR3 RAM and a 512GB SSD. I’m storing all my VMs on an external SanDisk 480GB SSD external drive. With this, combined with VMware Fusion 8, I am going to show you how to create a vSphere 6 environment. We will also create shared storage so that we can test features like HA and svMotion. Let’s get started.
The first thing we want to do is create our different networks for the different vSphere features that we want to use. We will create 5 different subnets for our network, one for each feature.
10.10.2.0 – Management Network
10.10.3.0 – iSCSI/Storage Network
10.10.4.0 – Fault Tolerance Network
10.10.5.0 – vMotion Network
10.10.6.0 – VM Network

