VMware

vRA Icon

Now that we have setup our endpoint and a data collection has ran to discover our vCenter resources, its time to start carving those resource up for use…and fabric groups are the starting point. An IaaS administrator can organize compute resources into fabric groups by type and intent. One or more fabric administrators manage the resources in each fabric group. Fabric administrators are responsible for creating reservations on the compute resources in their groups to allocate resources to specific business groups. Fabric groups are created in a specific tenant, but their resources can be made available to users who belong to business groups in all tenants. To begin with creating our fabric group, we need to login as the IaaS administrator and navigate to Infrastructure > Endpoint > Fabric Groups. Click New

fab01 Read Full Article

vRA Icon

So far, we’ve created our tenant and we got the tenant setup with Active Directory authentication. The next step we want to take is to create a vSphere endpoint that will allow vRealize Automation to communicate with the vSphere environment and discover compute resources, collect data, and provision machines. To begin, we must first login to our tenant as a IaaS administrator. Once we have done that, we want to navigate to Infrastructure > Credentials to enter in the credentials that the endpoint will use to login in order to see the available resources. Click New.

end01 Read Full Article

vcsa penguin

After the initial deployment of your vCenter Server Appliance and Platform Services Controller, one of the first things that you want to do if you are using Active Directory is to join your PSC to the domain. In this blog post we are going to walk through doing just that. Like Active Directory domain controllers, the PSC really depends on time being synchronized within your network. The easiest thing to do would be to point all of your devices to the same NTP source. So before beginning, make sure the time is the same on all your devices. Once you have verified that, log into the PSC web UI as the admin account.

psc01 Read Full Article

Over the past few months, I’ve been searching for a good home lab server to replace the ones I had been using that were decommissioned and given to me by my previous employer…3 HP DL385 G6 rack servers with 64GB each. Well anyone that knows servers, know that these are not ideal from a home lab. Not only are they big, bulky and heavy, but they suck electricity like a newborn baby sucks a warm bottle (I can attest to this, being a new dad to a healthy,hungry boy) and on top of that, they can make a room HOT…really fast! I knew this was not a long term solution for me and there was only so much that I could do with VMware’s online HOL. I needed something that I could not only have to test out all the latest products from VMware without a 2hr or so limit, but also something that I could continue to use to prepare for advanced certifications and create content to share on the blog.

What I Wanted In A Server

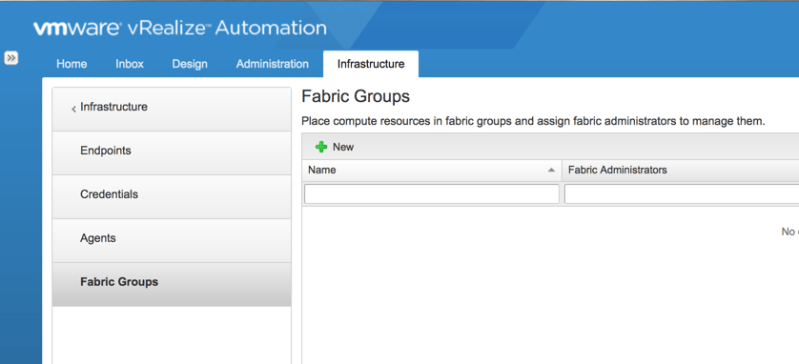
First of all…it needed to be small. I have a office at home…not a dedicated server room. I wanted something no bigger than a desktop tower PC. To me, the smaller, the better. I also wanted something that would provide me with enough resources to run two of VMware’s most resource intensive products, NSX and vRealize Automation. Those two products alone would need about 50GB of RAM to install all the components to get up and running. I first began looking into the SuperMicro SYS-E200-8D and SYS-E300-8D servers. I was drawn first to their size and then to the fact that they could max out at a whooping 128GB of RAM. However, I didn’t like the idea of only have 2 options for storage, one 2.5 HDD and one M.2 slot. Then I stumbled across Paul Braren from TinkerTry on Twitter and that’s when I discovered what would soon be my next home lab server.

What I Got

I ended up purchasing a SuperMicro SYS-5028D-TN4T server bundle from WiredZone and added two additional 32GB DIMMs to have a total of 128GB of RAM.


img_3766 Read Full Article

VMwareNSX

In this blog post we will be deploying the NSX manager appliance. This is the first step in beginning to deploy NSX in your VMware environment. First things first, after downloading the NSX OVA file, right click on the cluster you want to deploy the appliance in and click Deploy OVF Template. Browse to and select the NSX OVA file and click Next.

man01

Read Full Article

vRA Icon

This post will be a short walkthrough on how to create a tenant in vRealize Automation 7. After you complete the initial installation of vRA, you have the default tenant that is created. The default tenant is not where we want to create and deploy any services. The default tenant should be used for creating other tenants and defining other administrators. To begin creating our first tenant we must first log into our default tenant. Navigate to https://FQDN or IP of vRA appliance/ and login with the administrator account that was created during installation

t1

Read Full Article

VMwareNSX

The NSX service composer is one of my favorite features of NSX. I’ve never really considered myself to be lazy when it comes to doing something the right way…but I’ve never been one to overwork myself to do that. Dad always said “Work smarter, not harder”. The service composer is a combination of both. It’s a way to create multiple rules in your virtual infrastructure for items that are alike or that need to have the same type of services allowed or denied. For you Cisco guys, this is a familiar concept. Think objects and object groups on a ASA. For example, say I have a group of 6 web servers that I want to block ICMP traffic. Well that would normally mean that I would have to create 6 individual rules, one for each web server, to block this. With the service composer, however, I can create one rule. With the use of security groups and security policies, service composer makes life easy…and that doesn’t mean that you’re lazy 🙂

In this blog post, I will show you how to use the service composer to create a security policy and apply it to multiple servers.

First navigate to Networking & Security > Service Composer

sc2 Read Full Article

VMwareNSX

Picking up from where we left off, in our last post, we deployed the NSX Edge Appliance and created interfaces to connect to each of our logical switches to allow for communication between the VMs on each logical switch. In this post we will configure OSPF as our dynamic routing protocol between the edge appliance and the logical router.

Navigate to Networking & Security>NSX Edges. Double click the Edge Router. Under Manage>Routing>Global Configuration click Edit by Dynamic Routing Configuration.

dyr1 Read Full Article

VMwareNSX

In this post we will be deploying an additional Edge Services Gateway (ESG) so that we can take advantage of Equal-Cost Multipath (ECMP) from the distributed logical router to the ESG. The advantage of using ECMP is that you can split the traffic from VMs evenly between the ESGs and have multiple bidirectional links. Let’s get started configuring!

Navigate to Networking & Security > NSX Edges and click the green + to begin deploying a new ESG.

ecmp1

Read Full Article