

Objective 3.1 – Configure and Manage Logical Load Balancing
- Configure the appropriate Load Balancer model for a given application topology
- Configure SSL off-loading
- Configure a service monitor to define health check parameters for a specific type of network traffic
- Optimize a server pool to manage and share backend servers
- Configure an application profile and rules
- Configure virtual servers
The NSX Edge load balancer enables applications to be distributed across multiple back end servers in a pool. There are some terms that we should be familiar with in reference to the NSX load balancer.
- Virtual IP Address (VIP): An IP address and service port used by the user to access the service
- Server pool: this is a pool of the servers that will be load balanced. The VIP is the address that is in front of the server pool.
- Service monitor: It is the health check parameters for a particular type of network traffic. A service monitor monitors the servers in a server pool.
- Application profile: Defines the behavior of a particular type of network traffic.
Configure the appropriate Load Balancer model for a given application topology
The NSX Edge services gateway supports two kinds of load balancer deployments:
- One-arm load balancer
- Inline load balancer
The following modes are available for load balancing:
- Layer 4: Packet-based load balancing. A packet based load balancing is implemented on the TCP and UDP layer. Packet based load balancing sends the packet directly to the servers.
- Layer 7: Two connections are established for a single request, a client-facing connection and a server-facing connection. The server-facing connection is established after server selection. For HTTP socket-based implementation, the whole request is received before sending to the selected server. Socket-based load balancing is the default mode for TCP, HTTP, and HTTPS virtual servers.
One-armed load balancer: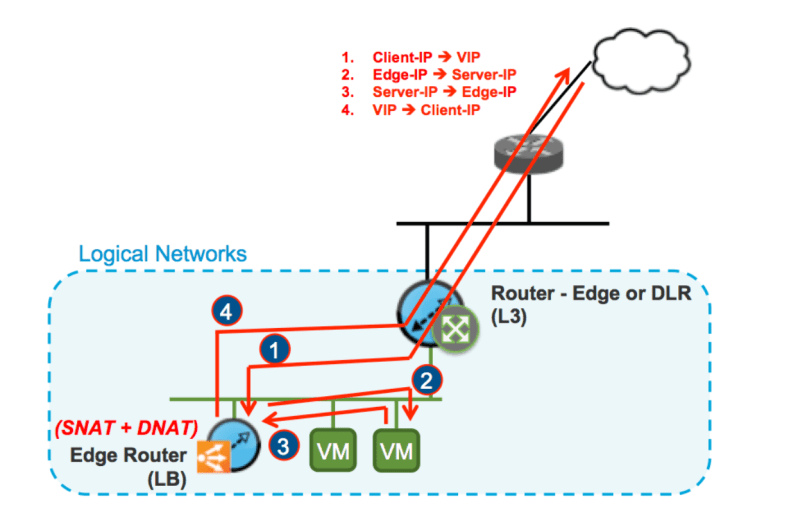
How it works:
- The external client sends traffic to the VIP that is exposed by the load balancer
- The load balancer performs two address translations on the original packet received from the external client: a DNAT to replace the VIP with the IP address of one of the servers in server pool and a SNAT to replace the client IP with the IP address identifying the load balancer itself. SNAT is required to return the traffic from the server pool back to the client through the load balancer.
- The server in the server farm replies by sending the traffic to the load balancer
- The load balancer performs a SNAT and DNAT to send traffic to the external client, using the VIP as the source address.
The advantage of this model is that it is simpler to deploy. You are deploying the load balancing services directly on the logical switch where they are needed without making changes to the central NSX edge that is providing routing between the virtual and physical network. The downside is that this requires deploying more NSX edge appliances and you have to have SNAT, which doesn’t allow the servers within the DC to have visibility to the original client IP.
*NOTE*
The load balancer can insert the original IP address of the client into the HTTP header before doing SNAT. The Insert X-Forwarded-For HTTP header option can be turned on. This provides the servers visibility into the client IP but only for HTTP traffic.
Inline Load Balancer
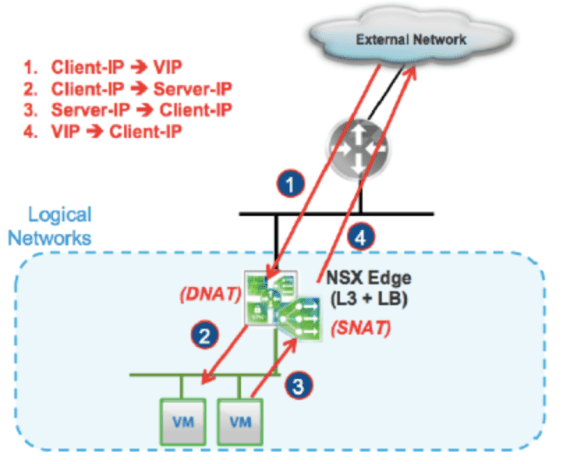
How it works:
- The external client sends traffic to the VIP exposed by the load balancer.
- The load balancer (the main provider edge) performs only a DNAT to replace the VIP with the IP address of one of the servers deployed in the server pool.
- The server in the server pool replies to the original client IP address and the traffic is received again by the load balancer.
- The load balancer performs a SNAT to send traffic to the external client, using the VIP as the source IP address
This deployment allows the servers to have full visibility into the original client IP address. This design forces you to use the load balancer as the default gateway for all servers on the logical segment where the server pool is deployed. As this is another service that is added to the central NSX edge device, it is recommended to change the size of NSX edge to X-Large before enabling load balancing.
Configure Load Balancing
Navigate to Networking & Security > double click your NSX Edge > Manage > Load Balancer > Global Configuration. Click Edit. Select the box next to Enable Load Balancer. Click OK.

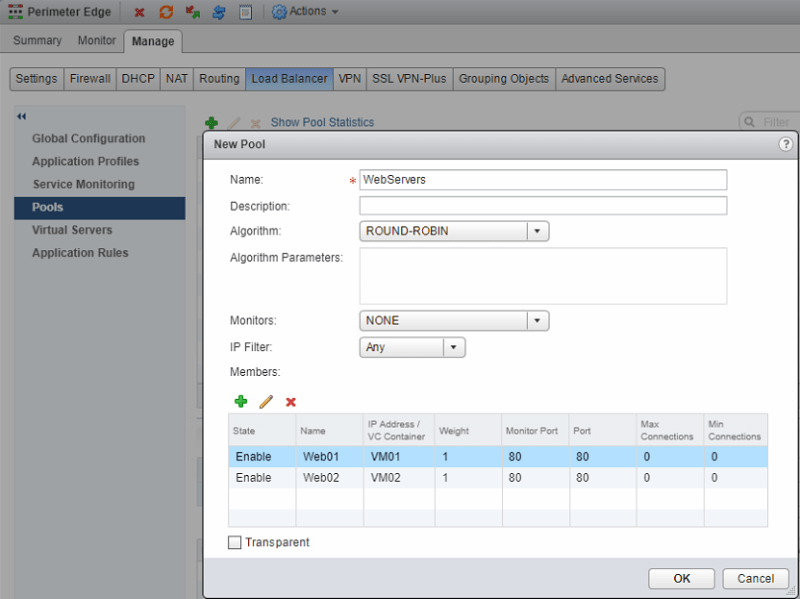
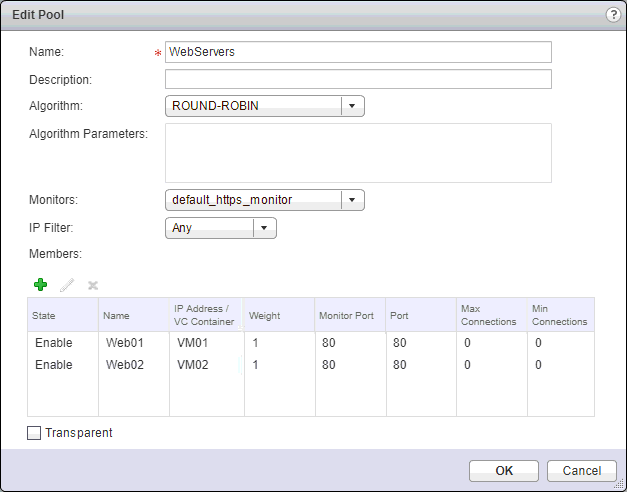
Now we want to create our server pool to be load balanced. Click Pools under the Load Balancer tab and click the green +. Under Members, we can add the VMs, port, monitor port, max and min connections. Click OK.
Now when I browse to the VIP address, I hit one of the web servers in my server pool as shown by the default IIS page.
Configure SSL Off-loading
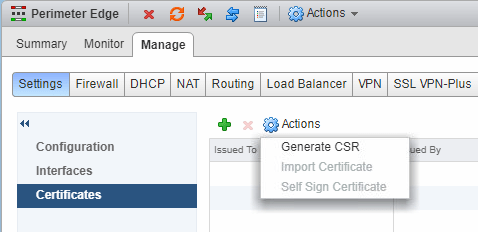
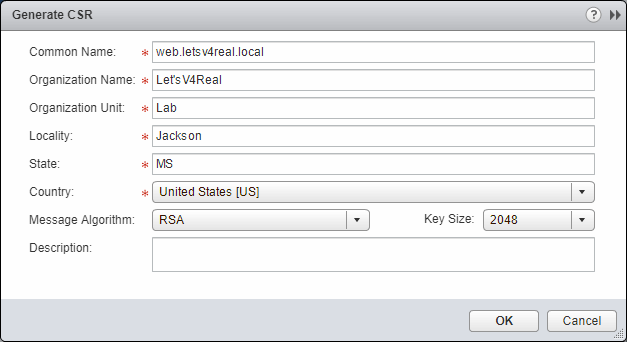
SSL off-loading allows the NSX LB to handle the SSL decryption/encryption before passing the traffic on to the backend server pool. This takes the duties of having to do so from the backend servers. So between the external client and the LB the traffic is HTTPS but between the NSX Edge and the backend servers it is HTTP. NSX also supports SSL Proxy, which terminates the SSL at the LB but passes the traffic to the backend servers as HTTPS, and it supports SSL Passthrough, which passes the HTTPS traffic through the LB and on to the backend servers to do the SSL termination. Here I will be configuring SSL offloading. In order to complete this task, I’m going to generate a self signed cert. Since this is a lab environment, it’s fine just for testing. To begin doing that, navigate to Networking & Security > NSX Edges > double click your NSX Edge > Manage > Settings > Certificates. Click the Actions wheel and click Generate CSR.
Fill out the CSR info. Click OK.
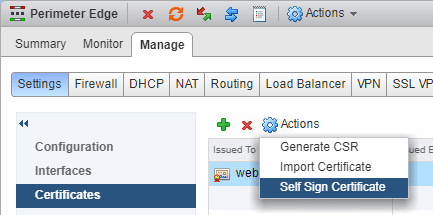
Now back at the Actions wheel, click Self Sign Certificate. And it will generate the cert.
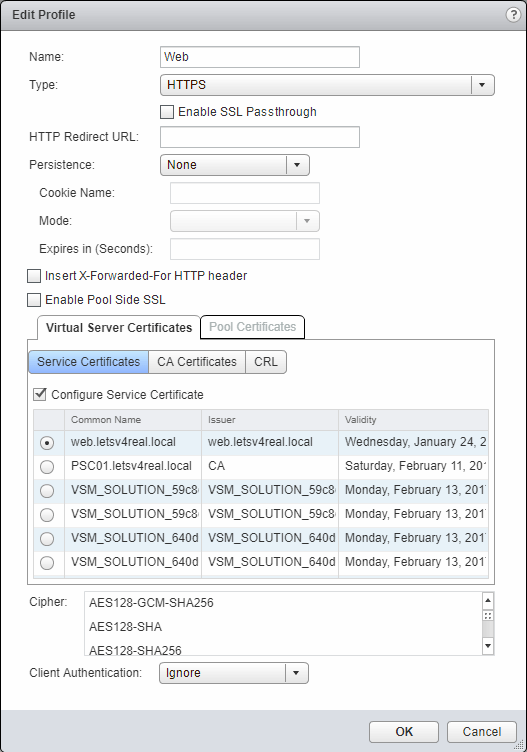
We can see the cert that we just created. Now navigate to Manage > Load Balancer > Application Profiles and edit the profile we created earlier.

Change the traffic type to HTTPS. You’ll notice that now, in the once grayed out area, you can select a service certificate. Select the Configure Service Certificate box and select the cert that we just generated. Click OK.
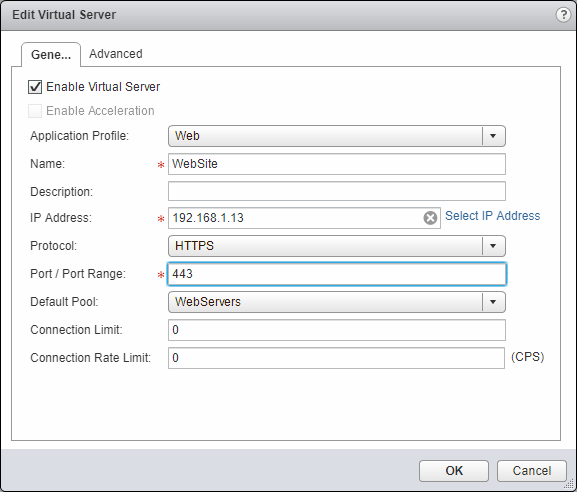
Now under Manage > Load Balancer > Virtual Servers edit the service we created earlier. Change the protocol to HTTPS and the port to 443. Click OK.
Now after adding a DNS entry to point web.letsv4real.local to my VIP, I am able to hit one of my backend web servers over HTTPS. Also, you can see that we are using the cert from the NSX Edge LB.

Configure a service monitor to define health check parameters for a specific type of network traffic
A service monitor is used by the load balancer to do health checks on certain network traffic. You create a service monitor and then you assign it to your backend server pool. When you associate the service monitor with a pool, the pool is then monitored based on the parameters set in the service monitor. You can monitor the following protocols: ICMP, TCP, UDP, HTTP, HTTPS, DNS, MYSQL and LDAP.
To create a service monitor, navigate to Networking & Security > NSX Edges > double click your NSX edge > Manage > Load Balancer > Service Monitoring and click the green +. For this example, we will just use one of the default monitors that are already there.

For this example, we will just click edit on the default HTTPS monitor

Let’s go over some of the entries that you will define in the service monitor and what they mean.
- Interval: The interval is the period in seconds that the monitor sends requests to the backend server
- Timeout: This is the maximum time in seconds that a response from the backend servers must be received.
- Max Retries: This is the number of times a server is tested before it is considered to be down
Also, depending on the monitor type you select, you will get different parameters. If you select TCP, you will get Send, Receive, Extension

Send: the string to be sent to the backend servers
Receive: the response from the backend servers in order for them to be considered alive
Extension: Advanced monitor parameters entered in as key=value pairs
There’s an entire table of extensions for TCP in the NSX admin guide:

If you select HTTP or HTTPS as the monitor type, you will the following parameters:
Expected: the string that the monitor expects to match in the status line of HTTP response
Method: the method used to detect server status. It can be either GET, OPTIONS, or POST
URL: the URL to GET or POST
Also there are a list of extensions that can be used for the HTTP/S protocol

There are a number of other parameters that can be configured depending on what protocol you select but I will not go over all of these. Next lets associate a service monitor to a server pool. Navigate to your server pool and click edit and next to Monitors: click the drop down box and select the service monitor.
Optimize a server pool to manage and share backend servers
A server pool manages backend servers to be able to share workloads efficiently. A server pool manages load balancer distribution methods and uses a server monitor for health checks. NSX supports certain algorithms for balancing methods as listed below:
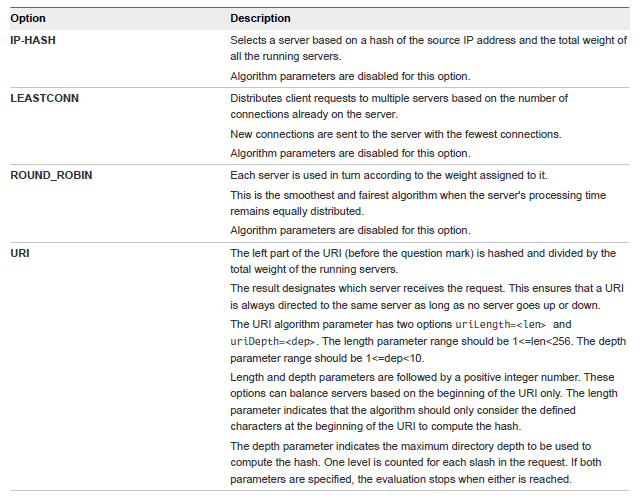
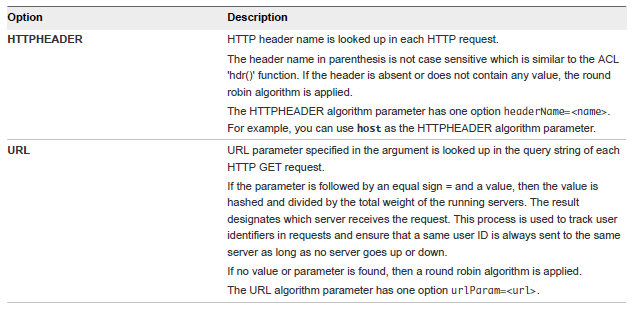
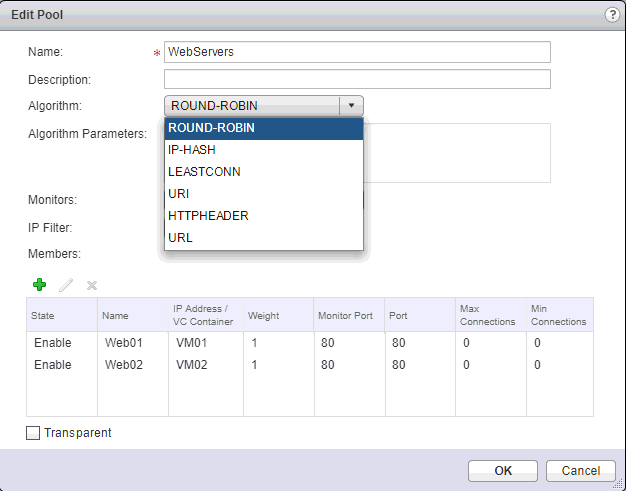
You can change the load balancing algorithm by navigating to your server pool and changing it in the Algorithm drop down
You can also change weights and other parameters per server member

Configure an application profile and rules
You use Application Profiles to enhance your control over network traffic and to make traffic management tasks easier and more efficient. Application profiles define the behavior of a particular type of network traffic. Once you have created a application profile, you associate it with your virtual server. The virtual server then processes the traffic based off what is specified in the application profile
To create a application profile:
Navigate to Networking & Security > NSX Edges > double click the NSX edge > Manage > Load Balancer > Application Profiles. Click the green +. (In our case we already have a profile so we will edit that one)
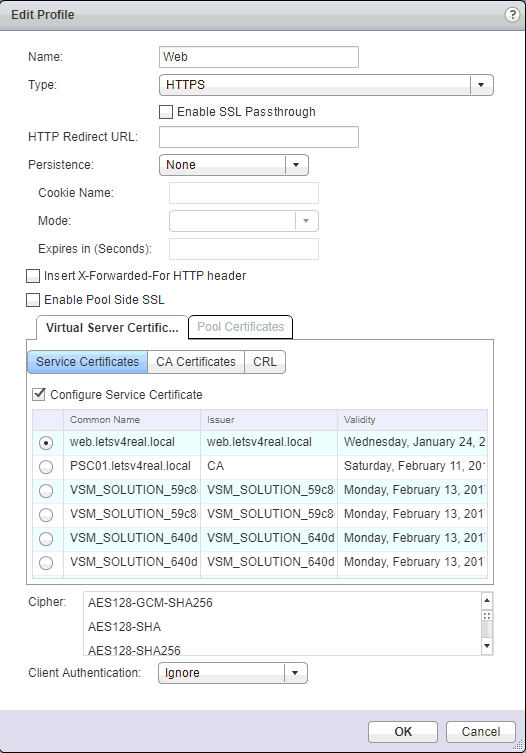
Let’s go over some of the options you can configure in the application profile.
Type: The type of traffic
HTTP Redirect URL: URL that can be redirected to
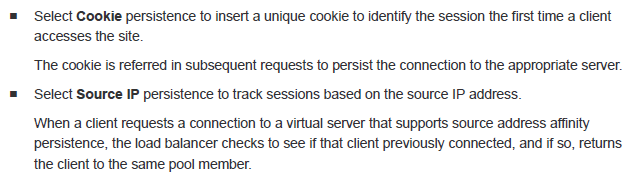
Persistence: This is what tracks and store session data. With it, clients are directed to the same pool member throughout the session. NSX supports Cookie and Source IP.
Here’s a explanation of the two persistence types from the NSX admin guide:
Insert X-Forwarded-For HTTP header: allows the backend server members to see the client IP
Enable Pool Side SSL: Turns on SSL between the load balancer and the pool members. Used for configuring end to end SSL.
Service Certificates: These are the certificates that you can use for SSL termination
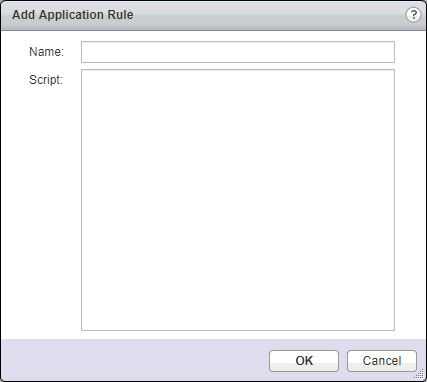
To create a application rule:
Application rules are used to directly manipulate and manage application traffic.
Navigate to Networking & Security > NSX Edges > double click the NSX edge > Manage > Load Balancer > Application Rules. Click the green +
Once you have created your application rule, you associate it with your virtual server under the Advanced tab.

Configure virtual servers
Navigate to Networking & Security > NSX Edges > double click the NSX edge > Manage > Load Balancer > Virtual Servers. Click the green +. Click Enable Virtual Server and fill in the information.

Besides the obvious settings that need to filled in here, Connection Limit specifics the number of concurrent sessions that can be processed and Connection Rate Limit specifies the maximum number of incoming new connections that can processed per second.
